
Many of you have asked me to share the process of how you go about hiding the fuel tanks, pylons, weapons and pilots that are part of Fernando's F-4 AI model so that it looks like a true QF-4 drone. Thanks to Mark we now have a wonderful set of textures to work with.
For starters you will need to get this program: DXT3 and install it to your system. Look towards the bottom of the page and click on the DXT3 button. Please do not ask me how to install it or why you may be having problems getting it to work. As I recall, it's a pretty straight-forward install and should work right off the bat. But if it doesn't you'll need to figure it out with help from Martin Wright, the program's author.
In addition, you need at least a basic graphics editor such as MSPaint. I use Paint Shop Pro which I purchased for $8 American off of EBay a couple years ago. You don't need the latest version of any graphics editor. Just a basic version will do. Once you have a paint program to use, you will need to go into the preferences section of DXT3 and set that paint program as you default editor. Now we're ready to go.
How to create reflective "invisible" QF-4 textures
How to create reflective "invisible" QF-4 textures
Last edited by MIKE JG on 30 Oct 2007, 21:37, edited 1 time in total.
-Mike G.
Recovering flight sim addict, constant lurker.
Check out my real life RV-8 build here: RV-8 Builder Log
Recovering flight sim addict, constant lurker.
Check out my real life RV-8 build here: RV-8 Builder Log
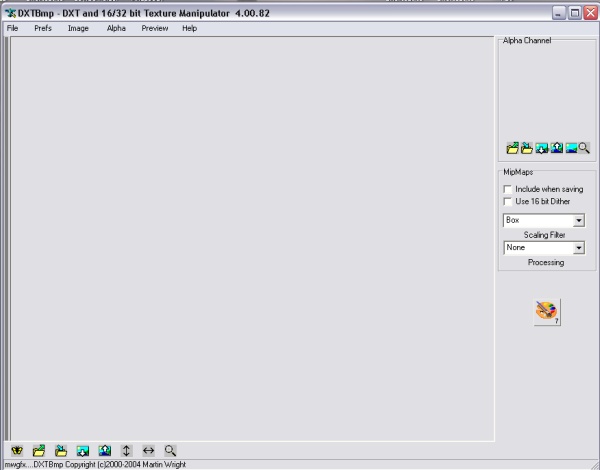
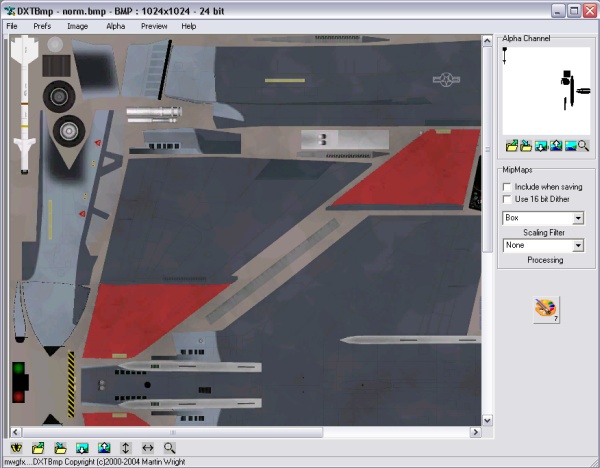
So first thing, open up DXT3 on your computer. You should see a screen that looks like this:
Next either through the file/open menu or dragging the texture file directly from its folder onto the DXT3 window, open up the QF-4 texture of your choice for editing. The file name is f4_base_t.bmp. The texture files are found inside each individual texture folder. There is only one texture file inside each folder unlike a FS9 user aircraft which will usually contain many individual texture files for a given model.
Once you have opened the file correctly inside of DXT3, you should have a screen that looks similar to this:
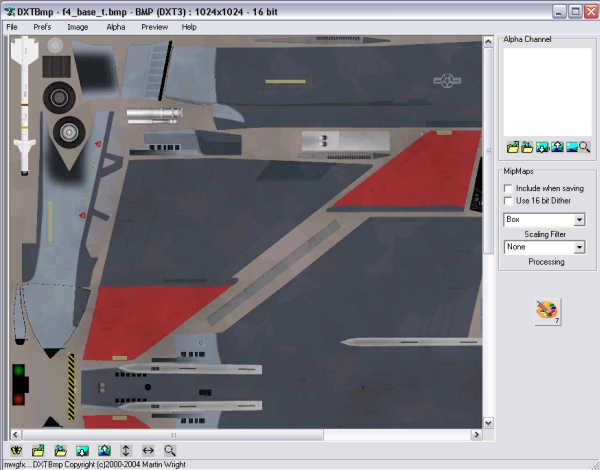
Don't worry that you can't see the whole texture file. It's there, but DXT3 won't show the whole thing in its window.
Now we want to create an alpha or reflective texture channel that ultimately ends up as part of the f4_base_t.bmp file itself. So in the end you will still just have the one texture file in each texture folder, we are just giving the file reflective properties to "hide" the items on the aircraft that we don't want to see.
A quick note on alpha channels. Alpha channels (reflective textures) are used by modelers and repainters to create a certain amount of reflection to their textures. For example in order for a modeler to create a transparent looking cockpit canopy, he must first create a solid object in his modeling software and then make it "see through" using reflective textures to make it look like a transparent piece of plexiglass or look like a cockpit window. Likewise a modeler or repainter can create a texture that looks like highly polished aluminum that has that unique reflection quality when you look at it. This is all done by varying the greyscale of the texture in the 256 black and white color system. So all alpha channels and their associated reflective textures are one of 256 shades of black to white. The darker the texture, the more reflective that surface will appear. 100% black is completely reflective, giving it an invisible look while 100% white is completely non-reflective, hiding nothing.
So for our purposes we want to "hide" the objects mentioned above by making them 100% transparent.
Next either through the file/open menu or dragging the texture file directly from its folder onto the DXT3 window, open up the QF-4 texture of your choice for editing. The file name is f4_base_t.bmp. The texture files are found inside each individual texture folder. There is only one texture file inside each folder unlike a FS9 user aircraft which will usually contain many individual texture files for a given model.
Once you have opened the file correctly inside of DXT3, you should have a screen that looks similar to this:
Don't worry that you can't see the whole texture file. It's there, but DXT3 won't show the whole thing in its window.
Now we want to create an alpha or reflective texture channel that ultimately ends up as part of the f4_base_t.bmp file itself. So in the end you will still just have the one texture file in each texture folder, we are just giving the file reflective properties to "hide" the items on the aircraft that we don't want to see.
A quick note on alpha channels. Alpha channels (reflective textures) are used by modelers and repainters to create a certain amount of reflection to their textures. For example in order for a modeler to create a transparent looking cockpit canopy, he must first create a solid object in his modeling software and then make it "see through" using reflective textures to make it look like a transparent piece of plexiglass or look like a cockpit window. Likewise a modeler or repainter can create a texture that looks like highly polished aluminum that has that unique reflection quality when you look at it. This is all done by varying the greyscale of the texture in the 256 black and white color system. So all alpha channels and their associated reflective textures are one of 256 shades of black to white. The darker the texture, the more reflective that surface will appear. 100% black is completely reflective, giving it an invisible look while 100% white is completely non-reflective, hiding nothing.
So for our purposes we want to "hide" the objects mentioned above by making them 100% transparent.
-Mike G.
Recovering flight sim addict, constant lurker.
Check out my real life RV-8 build here: RV-8 Builder Log
Recovering flight sim addict, constant lurker.
Check out my real life RV-8 build here: RV-8 Builder Log
So now we want to edit our QF-4 texture to hide the tanks, pilots, etc. So with your f4_base_t.bmp file loaded into DXT3, select the send to editor button at the bottom of the page to send this texture to your paint program. Remember DXT3 sets MSPaint as the default texture editor so if you are using something else, you must set that program as your default texture editor using the DXT3 preferences menu. Again the send to editor button is the little button with a downwards pointing arrow at the bottom of the DXT3 screen just above the word "copyright". Click that button and DXT3 will send this texture file to your chosen texture editor and open itup for you.
I use Paint Shop Pro so here is what it looks like when the file opens up in PSP and I have made the appropriate changes to it:
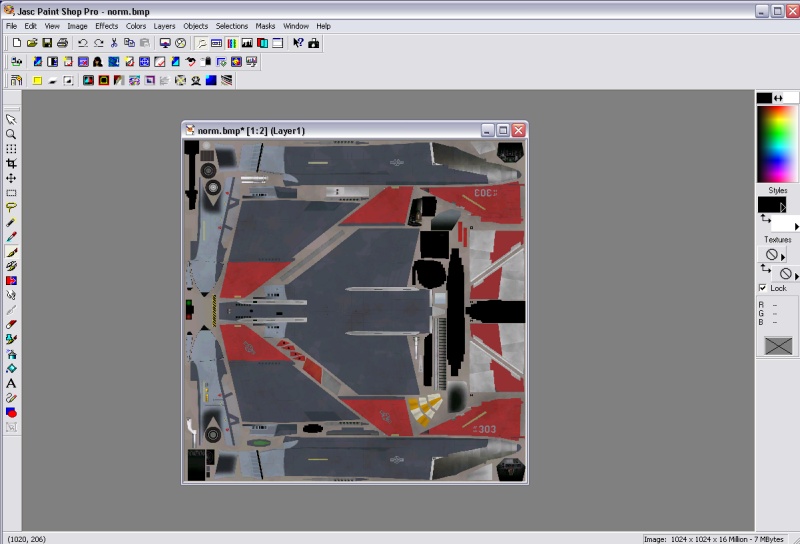
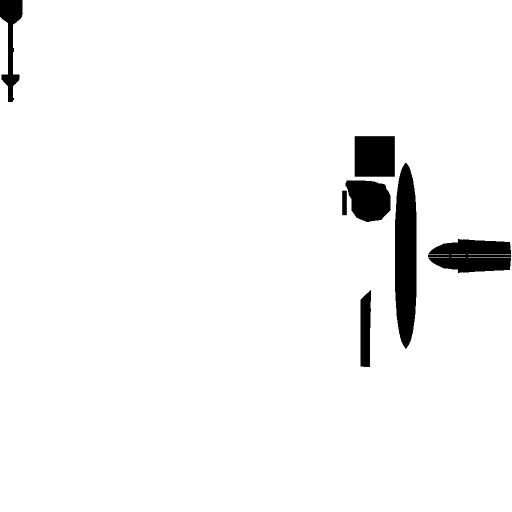
Now notice above that I have intentionally blacked out some parts from the texture file using the purest black color from my paint program. This is how we go about "hiding" the part we want to hide. So once you have your texture file opened up and can make changes to it, go ahead and use the black color to hide the missle in the upper left, the pilot's helmet, pilots body structure, the weapons pylons, and the fuel tanks. Again, anything you want to hide, must be completely covered in black. If you get a little crazy and accidentally cover other parts, those too will be hidden unless you erase your error and cover only the parts you wish to exclude from view.
So once you have finished that process, you have to color the rest of the image with your pure 100% white color, leaving the objects you wish to hide covered in black. Again, this is not actually a texture file that will show up in FS9, instead it is a texture definition that tells FS9 what to show and with how much transparency. So when you've finished all that, your texture should look something like this:
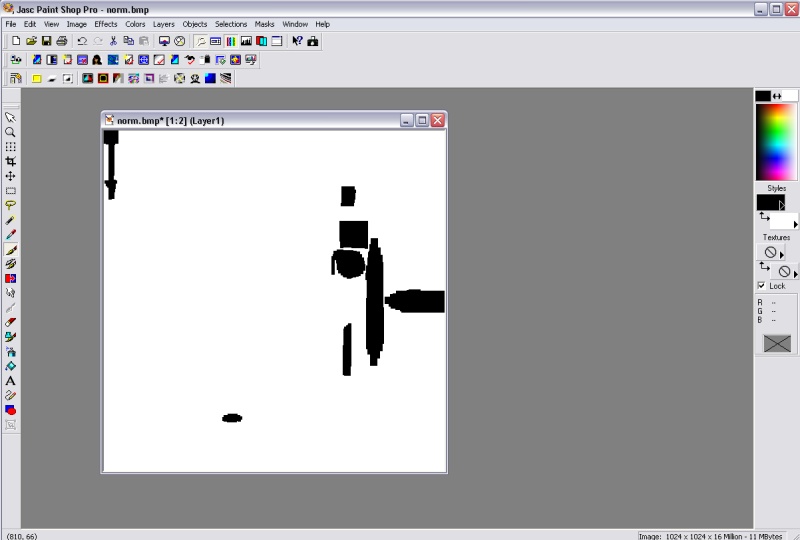
Now I want you to save this texture file as a .bmp file to a location that you will easily remember. The name of the file makes no difference, you can name it anything you want, just make sure to save it as a .bmp file. I alway choose to save things using the "save a copy as" function so that I can check them first and still have the original file available in case it doesn't save correctly.
So once you've saved a copy of your alpha channel it should be a stand alone .bmp file that you can open up with an image browser. Again it should look something like this:
and have dimensions of 1024x1024 to match the original texture. If it doesn't have 1024x1024 make sure that it at least has a derivative of those dimensions (256x256 or 512x512). DXT3 will automatically resize it to the correct dimensions when we load it to the alpha channel editor here in the next step.
I use Paint Shop Pro so here is what it looks like when the file opens up in PSP and I have made the appropriate changes to it:
Now notice above that I have intentionally blacked out some parts from the texture file using the purest black color from my paint program. This is how we go about "hiding" the part we want to hide. So once you have your texture file opened up and can make changes to it, go ahead and use the black color to hide the missle in the upper left, the pilot's helmet, pilots body structure, the weapons pylons, and the fuel tanks. Again, anything you want to hide, must be completely covered in black. If you get a little crazy and accidentally cover other parts, those too will be hidden unless you erase your error and cover only the parts you wish to exclude from view.
So once you have finished that process, you have to color the rest of the image with your pure 100% white color, leaving the objects you wish to hide covered in black. Again, this is not actually a texture file that will show up in FS9, instead it is a texture definition that tells FS9 what to show and with how much transparency. So when you've finished all that, your texture should look something like this:
Now I want you to save this texture file as a .bmp file to a location that you will easily remember. The name of the file makes no difference, you can name it anything you want, just make sure to save it as a .bmp file. I alway choose to save things using the "save a copy as" function so that I can check them first and still have the original file available in case it doesn't save correctly.
So once you've saved a copy of your alpha channel it should be a stand alone .bmp file that you can open up with an image browser. Again it should look something like this:
and have dimensions of 1024x1024 to match the original texture. If it doesn't have 1024x1024 make sure that it at least has a derivative of those dimensions (256x256 or 512x512). DXT3 will automatically resize it to the correct dimensions when we load it to the alpha channel editor here in the next step.
Last edited by MIKE JG on 30 Oct 2007, 21:44, edited 2 times in total.
-Mike G.
Recovering flight sim addict, constant lurker.
Check out my real life RV-8 build here: RV-8 Builder Log
Recovering flight sim addict, constant lurker.
Check out my real life RV-8 build here: RV-8 Builder Log
Now we go back to DXT3 where the screen should still look like this:
Up in the right hand corner of DXT3 is the alpha channel editor. This is where we add the alpha channels to any texture file we want. A little trial and error with this feature will teach you all kinds of interesting things about how reflective textures work. So again 100% white is non-reflective and 100% black is completely reflective or transparent. Hence for now, the alpha channel editor window is a pure white so that nothing in the original file is hidden or has any level of transparency. We're about to change that.
Using the "import alpha channel" button, which is the little folder underneath the alpha channel window with the arrow pointing up and to the right, we will now load our QF-4 reflective texture (alpha channel) into this window and add this to our f4_base_t.bmp texture file. Click on that button and it will ask you to locate your file, which you saved just a minute ago, you remember its name and location right? Load that in and you should now see your alpha channel in the alpha channel editor window just like in the picture below. Note the difference in the two images. The one on top has just the basic alpha channel with no alterations and the one below it has the changes that we have made to the alpha channel by blacking out certain objects on the model.
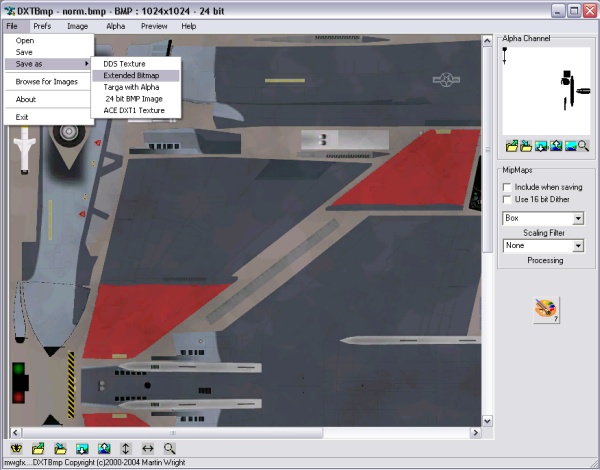
Now select file/save as/extened bitmap from the menu:
and overwright the original f4_base_t.bmp texture file. Either place the newly edited texture back into its correct folder and close DXT3 or just close DXT3 if you never moved the file and edited it directly from its texture folder.
Fire up FS9, and select the aircraft with this texture and see what it looks like. If you are happy with the changes you can now use your QF-4 alpha texture .bmp file as a "base" file from which to make the same changes to all of the other textures that Mark has done.
To do this, simply open up each individual texture in DXT3, one by one, and import your alpha channel that you created and saved, into the alpha channel editor window in the upper right of DXT3. Save each file, one by one as an extended bitmap using DXT3. That's the beauty of it, once you've created just one alpha channel, you can use it to alter all of the remaining textures, one at a time. Time consuming but well worth the results in the end.
Up in the right hand corner of DXT3 is the alpha channel editor. This is where we add the alpha channels to any texture file we want. A little trial and error with this feature will teach you all kinds of interesting things about how reflective textures work. So again 100% white is non-reflective and 100% black is completely reflective or transparent. Hence for now, the alpha channel editor window is a pure white so that nothing in the original file is hidden or has any level of transparency. We're about to change that.
Using the "import alpha channel" button, which is the little folder underneath the alpha channel window with the arrow pointing up and to the right, we will now load our QF-4 reflective texture (alpha channel) into this window and add this to our f4_base_t.bmp texture file. Click on that button and it will ask you to locate your file, which you saved just a minute ago, you remember its name and location right? Load that in and you should now see your alpha channel in the alpha channel editor window just like in the picture below. Note the difference in the two images. The one on top has just the basic alpha channel with no alterations and the one below it has the changes that we have made to the alpha channel by blacking out certain objects on the model.
Now select file/save as/extened bitmap from the menu:
and overwright the original f4_base_t.bmp texture file. Either place the newly edited texture back into its correct folder and close DXT3 or just close DXT3 if you never moved the file and edited it directly from its texture folder.
Fire up FS9, and select the aircraft with this texture and see what it looks like. If you are happy with the changes you can now use your QF-4 alpha texture .bmp file as a "base" file from which to make the same changes to all of the other textures that Mark has done.
To do this, simply open up each individual texture in DXT3, one by one, and import your alpha channel that you created and saved, into the alpha channel editor window in the upper right of DXT3. Save each file, one by one as an extended bitmap using DXT3. That's the beauty of it, once you've created just one alpha channel, you can use it to alter all of the remaining textures, one at a time. Time consuming but well worth the results in the end.
Last edited by MIKE JG on 30 Oct 2007, 21:49, edited 4 times in total.
-Mike G.
Recovering flight sim addict, constant lurker.
Check out my real life RV-8 build here: RV-8 Builder Log
Recovering flight sim addict, constant lurker.
Check out my real life RV-8 build here: RV-8 Builder Log
If you are having problems getting this to work, post them here and I'll see what I can do to help you. I make no claim that this is the only way to do this, it is simply one way that I know of.
Again there are a couple drawbacks to this method. Since we are merely "hiding" parts of the model that are still there, the model's shadow will still reveal the fuel tanks and missles. There's nothing that can be done about that without altering the actual model itself. So unless anyone knows of a "clean" variation of Fernando's F-4 AI model, we'll just have to live with that.
In addition, I've noticed on my system that parts of the missles, the very back surfaces of the control fins, do not dissapear. This may be for several reasons. Firstly I may not be hiding them on the original texture file because I can't figure out which part of the texture file that Fernando used to texture the back surface of the control fins. If I knew that, I could get them to hide themselves by altering the alpha channel. A second possibility is that Fernando either chose not to texture the back of the missle fins or he simply forgot. They are such a minute part of the model that he may not have bothered to texture them or may have never noticed that they didn't have any color to them. Again you would never notice this unless you hide the rest of the missle with a reflective texture like we are doing. You only see the back of the missle fins when viewing the model from behind so it's something I'm willing to live with for now.
Good luck with your homework.
-Mike G.
Recovering flight sim addict, constant lurker.
Check out my real life RV-8 build here: RV-8 Builder Log
Recovering flight sim addict, constant lurker.
Check out my real life RV-8 build here: RV-8 Builder Log


Great tutorial, Mike.
I wrote Mike about a week or two weeks ago and discussed this with him via PM and have run into the same limitation he mentioned. No matter where I looked in the texture I was unable to locate how to make the rear of the missile invisible. From a distance it looks great but if you get up close and shadow the aircraft it is is somewhat frustrating. However, it is what it is and I am grateful Mike brought to attention this technique.
Thanks again, Mike.
Another possibility is that Fernando textured the back of the missle by defining the texture using the middle of another part for color. In other words if he just randomly assigned the texture to another part of the aircraft that uses a grey texture, say the wing for example, then there truely is no way to hide that part.
-Mike G.
Recovering flight sim addict, constant lurker.
Check out my real life RV-8 build here: RV-8 Builder Log
Recovering flight sim addict, constant lurker.
Check out my real life RV-8 build here: RV-8 Builder Log